Do you want to create a custom single post template in WordPress?
Custom single post templates allow you to use different layouts for your individual blog posts. Many WordPress themes come with a few different page templates, and you can also create your own if needed.
In this article, we’ll show you how to easily create custom single post templates in WordPress. We’ll share multiple methods, so you can choose one that works best for your needs.

When Do You Need a Custom Single Post Template?
Sometimes you may want a different look and feel for certain posts on your WordPress website. For instance, you may want to use a different layout for featured articles or stories in a particular category.
This is where you need a custom single post template in WordPress.
By default, WordPress uses the single post template based on the WordPress template hierarchy. All themes come with a single.php template, and this is used by default for all of your single posts.
Some themes may also include additional templates or layout choices that you can use.
It is very much like creating a custom page template. Most WordPress themes also come with page templates that you can use while editing a post or page in WordPress.
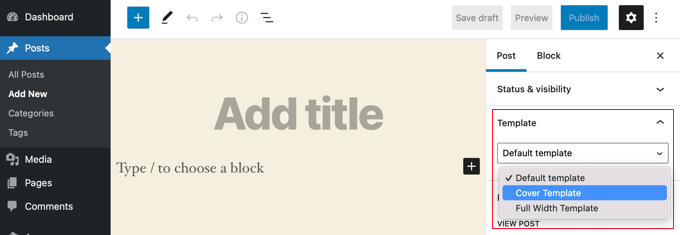
Having said that, let’s take a look at how to easily create custom single post templates in WordPress. We’ll show you multiple methods, so you can use the one that works best for you.
- Creating single post templates using the block editor
- Creating custom single post templates using SeedProd
- Using theme settings to create single post layouts
- Manually creating custom single post templates with code
- Creating custom single post templates by category
- Creating custom single post templates for specific authors
Creating Single Post Templates Using the Block Editor
This method does not really create a post template and is limited in flexibility. However, it is the easiest way to save your own single post layouts and then reuse them.
The default WordPress block editor comes with a built-in feature that allows you to save and reuse blocks. One such reusable block is the group block.
The group block allows you to put several blocks and entire post layouts into one group. You can then save this group block and reuse it in your other posts.
Let’s take a look at how to use the group block to save your custom post templates.
First, you need to create a new post in WordPress. After that, simply add a group block to the content area.
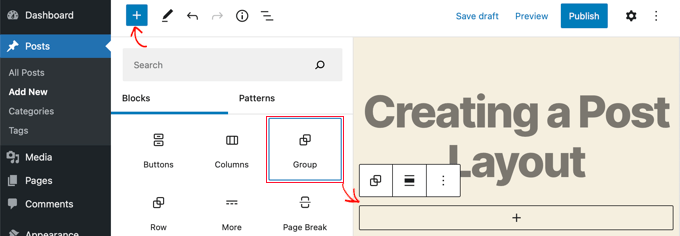
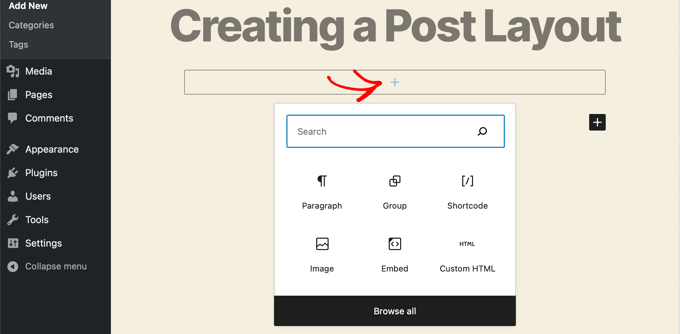
Now you can start adding blocks into the group block to create a single post layout for your WordPress blog.
You can add any blocks you want including columns, media and text, cover images, and more.
Once you are satisfied with the layout you have created, you need to take your mouse up and select the group block.
Simply click on the three-dot menu icon and then select the ‘Add to Reusable blocks’ option.
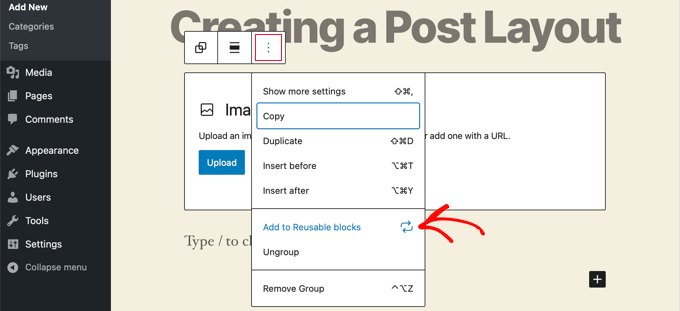
Next, you need to provide a name for the reusable block and then click on the Save button. WordPress will now save your reusable block including all the blocks inside the group block.
You can then edit any existing post on your website or create a new one. On the post edit screen, simply click on the add new block button and look for your saved block under the ‘Reusable’ tab.
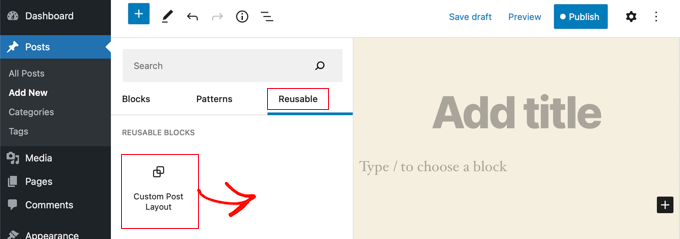
Add the block to your post and WordPress will load your entire group block with all the blocks and settings as you saved them.
This method allows you to save your custom layouts. However, it does not allow you to change how your theme handles single posts.
If you would like greater flexibility, then continue reading the next step.
Creating Custom Single Post Templates Using SeedProd
The easiest way to create a custom single post template is by using SeedProd. It’s the best WordPress website builder plugin and can create beautiful website layouts and custom templates without writing any code.
You can use SeedProd’s drag-and-drop builder to create a fully custom WordPress theme, including custom single post templates.
The first thing you need to do is install and activate the SeedProd plugin. For more details, see our step by step guide on how to install a WordPress plugin.
Upon activation, you need to enter your license key. You can find this information under your account on the SeedProd website.

After that, it’s time to create a custom WordPress theme. This is much simpler than it sounds.
Creating a Custom WordPress Theme
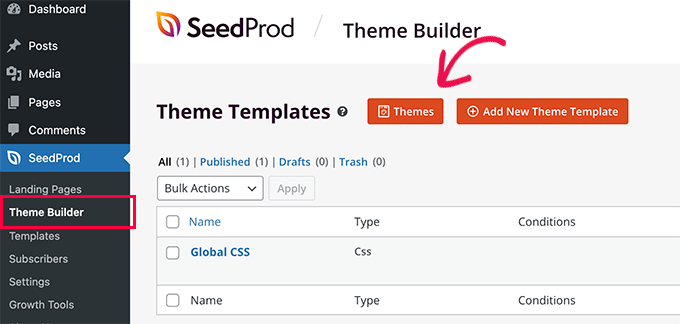
First, you need to head over to the SeedProd » Theme Builder page. Here, you’ll use one of SeedProd’s ready-made themes as a starting point. This will replace your existing WordPress theme with a new, custom design.
You can do that by clicking the ‘Themes’ button.
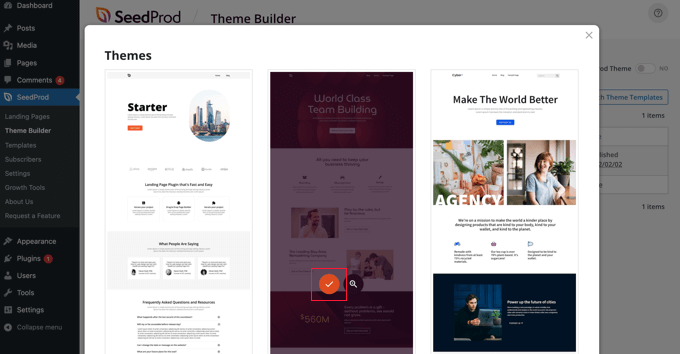
You will be shown a list of professionally designed themes that are designed for different types of websites. For example, there are templates called ‘Modern Business’, ‘Marketing Agency’, and ‘Mortgage Broker Theme’.
Take a look through the options and select one that best matches your needs by clicking the checkmark icon.
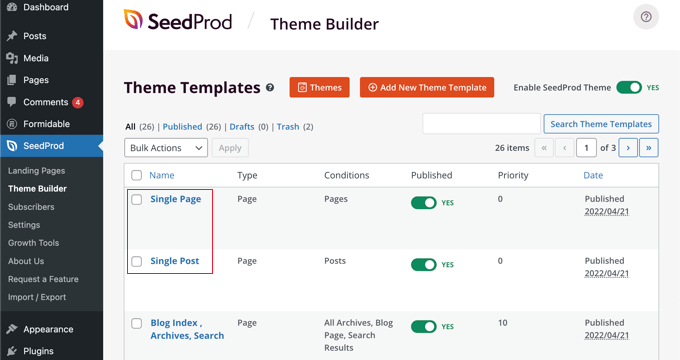
Once you have chosen a theme, SeedProd will generate all the theme templates you need, including one for single pages and another for single posts.
Each template comes set up with attractive layouts and placeholder content that’s easy to customize.
To learn more about creating a theme with SeedProd, see our guide on how to easily create a custom WordPress theme without any code.
Customizing the Default Single Post Template
SeedProd makes it easy to customize the default ‘Single Post’ template using a drag and drop page builder.
Simply click the ‘Edit Design’ link found under the template. This will open your post template in SeedProd’s visual editor.

SeedProd’s visual editor has a 2 column layout. On the left, you’ll find blocks and sections that you can add to your design. And on the right is a preview of the template where you can see your changes in real-time.
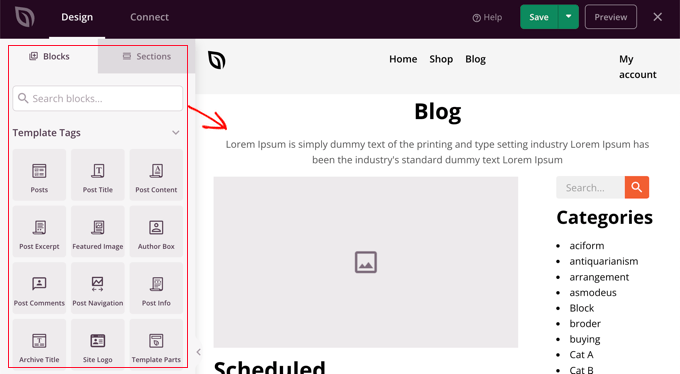
It’s also easy to customize the layout of your post template. Simply click on any block to see its settings in the left column.
For example, if you click on the post title, then you’ll be able to see its settings. Now you can change the alignment, font size, heading level, and more.
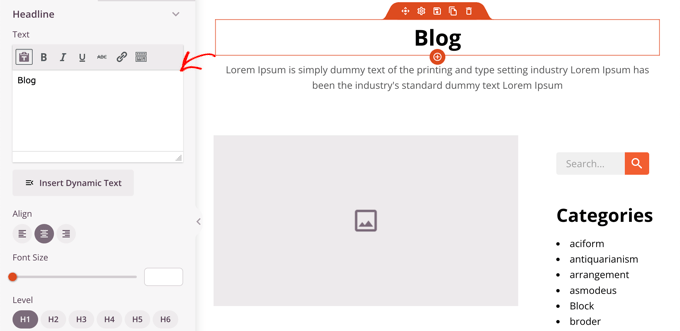
Clicking the Advanced tab lets you change font colors, spacing, and other styles.
You can add additional blocks by dragging them from the left column into the preview column. SeedProd uses template tags to pull in dynamic content like post titles, featured images, comments, and more. This lets you add content to the template without having to edit each post individually.
For example, you can add a Posts block at the end of your post content. This will display recent posts that your visitors may wish to read when they finish the current post. This block will be shown automatically on all posts using this template.
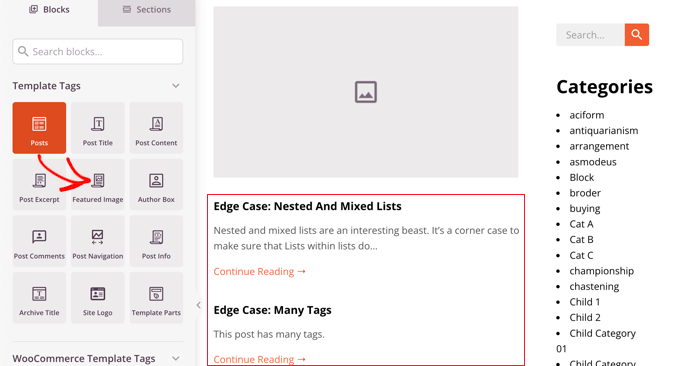
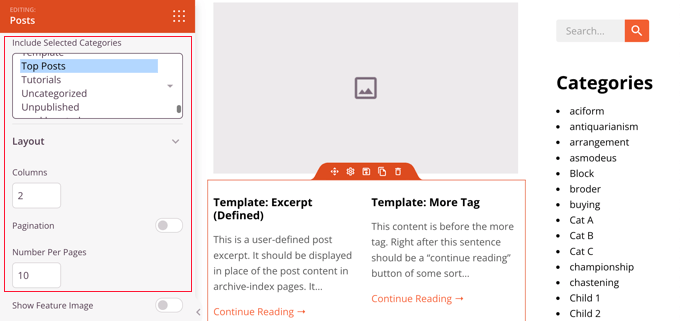
Next, you can change the settings of the Posts block to customize the content that is shown.
For example, you can display content from specific categories, use a two-column layout, and change the number of posts that are shown.
Feel free to spend time experimenting with different blocks and exploring their settings.
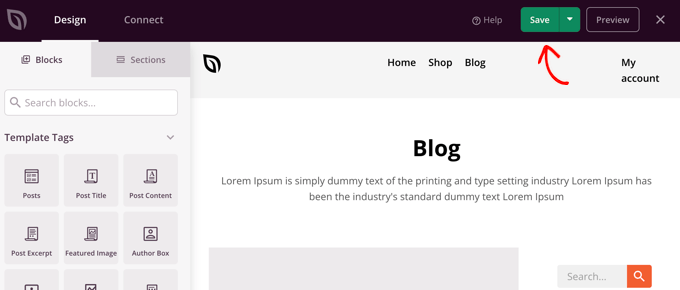
After creating something you’d like to use as your post template, it is time to save it by clicking the green ‘Save’ button in the top right corner. After that, you can close the SeedProd visual editor by clicking the ‘X’ close icon.
You can customize the rest of your WordPress theme in the same way. But if you need a little help, then refer back to our step-by-step guide on how to create a custom WordPress theme with SeedProd.
When you’re happy with how everything looks, make sure the ‘Enable SeedProd Theme’ switch is toggled to the on position. Your WordPress site will now use your SeedProd theme and custom single post template.

Using Theme Settings to Create Custom Single Post Layouts
Many popular WordPress themes come with built-in settings to customize the appearance of your single post template.
If your theme supports these settings, then you’ll be able to find them on the post edit screen. The options available may change depending on the theme you are using.
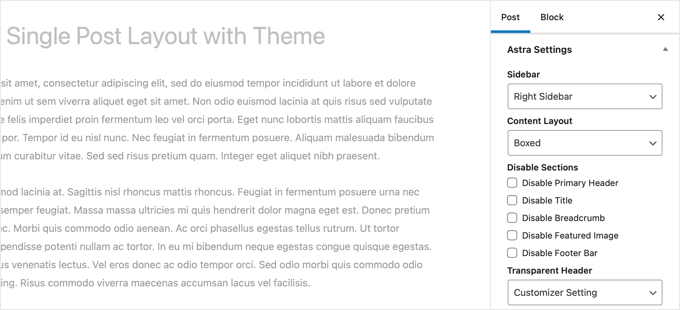
For instance, the Astra theme offers customization options when editing a single post. Using these options, you can change sidebars, hide headers, title, menus, and more.
On the other hand, many of the top WordPress themes come with ready-to-use templates that you can use.
If your theme includes single post templates, then you will find them under the ‘Template’ or ‘Post Attributes’ panel while editing a post.
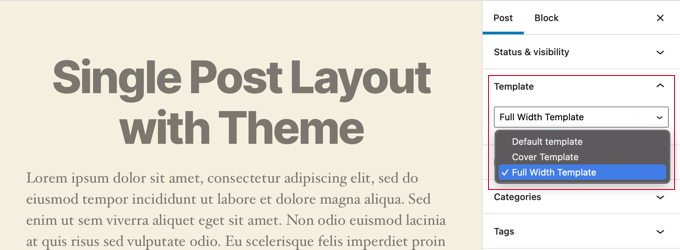
These templates are complete layouts that you can use with no configuration required.
Manually Creating Custom Single Post Templates With Code
This method is a bit advanced as it requires you to edit theme files, copy and paste code, and optionally add custom CSS. If you haven’t done this before, then check out our tutorial on how to copy and paste code in WordPress.
First, you need to open a plain text editor on your computer like Notepad and paste the following code inside it:
<?php
/*
 * Template Name: Featured Article
 * Template Post Type: post, page, product
 */

 get_header();  ?>
This code defines a new template called ‘Featured Article’ and makes it available for post, page, and product post types.
You should save this file as wpb-single-post.php on your desktop. Next, you need to add the template to your WordPress site. To do that, you need to use an FTP client to upload the file to your current theme folder.
Now you can log in to your WordPress admin area and create or edit a post. Scroll down a little on the post edit screen, and you will notice a new ‘Template’ panel or ‘Post Attributes’ meta box with an option to select the template.
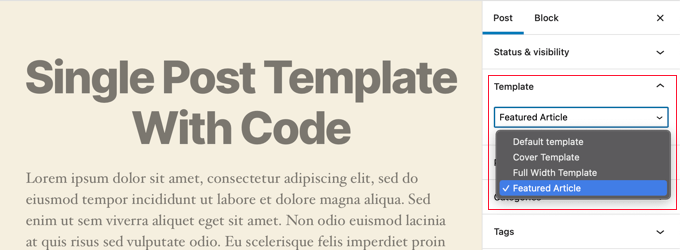
You will see your ‘Featured Article’ custom template listed there.
Right now your template is essentially empty so selecting it will simply display a white screen.
Let’s fix this.
The easiest way to do that is by copying the code from your theme’s single.php file and using it as a starting point. You’ll have to open the single.php file and then copy everything after the get_header() line.
Next, you need to paste this code at the end of your wpb-single-post.php file. Now you can save this file and upload it back to your server.
However, this will look exactly the same as your current single post template. You can now start making changes to your custom single post template.
You can add your own custom CSS classes, remove sidebars, create a full width template, or anything you want.
Creating Custom Single Post Templates by Category
Would you like to use a custom single post template based on categories? For example, you can give posts in the travel category a different layout to posts in the photography category.
You can do that using either the SeedProd Theme Builder or code.
Creating Custom Single Post Templates by Category Using SeedProd
Earlier we covered how to customize the SeedProd Theme Builder’s default single post template. But it doesn’t stop there. With SeedProd you can add as many custom post templates as you like, such as a different layout for every post category.
To add a new single post template, just click the ‘Duplicate’ link under the original post template. A new template called ‘Single Post – Copy’ will be created and added to the top of the theme templates page.
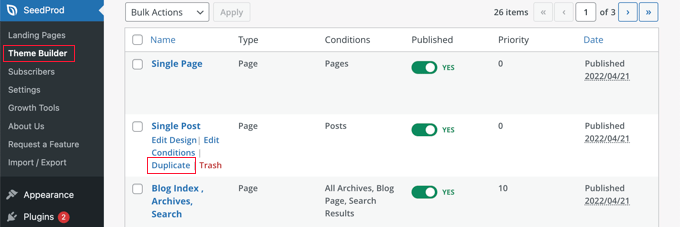
You can customize the new template in the same way you customized the default Single Post template earlier. Simply click the template’s ‘Edit Design’ link and make any changes you like using SeedProd’s visual editor.
When you’ve finished customizing the template, you will need to add some conditions so that SeedProd will know which posts should use this template. In this case, we want it displayed when viewing posts within a single category.

You can do that by clicking the template’s ‘Edit Conditions’ link and a new window will pop up.
Here you can give the template a name and priority. The default Single Post template has a priority of 0, so make sure you give this template a higher priority so it will be displayed on matching categories.
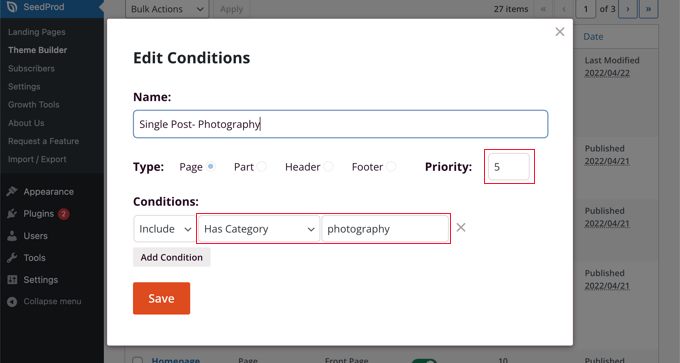
Under ‘Conditions’, select ‘Has Category’ from the second drop down menu, then type the name of the category in the last field. For example, if you only want posts from the photography category to use this layout, then type ‘photography’.
When you’re finished, click the ‘Save’ button and now this template will be used for all posts in the matching category.
This is the easiest way to create multiple custom post templates in WordPress. It doesn’t require any knowledge of code and won’t accidentally mess up any theme files.
Creating Custom Single Post Templates by Category Using Code
This is another method for those who are comfortable adding code to their theme files.
First, you need to add this code to your theme’s functions.php file or a code snippets plugin.
/*
* Define a constant path to our single template folder
*/
define(SINGLE_PATH, TEMPLATEPATH . '/single');

/**
* Filter the single_template with our custom function
*/
add_filter('single_template', 'my_single_template');

/**
* Single template function which will choose our template
*/
function my_single_template($single) {
global $wp_query, $post;

/**
* Checks for single template by category
* Check by category slug and ID
*/
foreach((array)get_the_category() as $cat) :

if(file_exists(SINGLE_PATH . '/single-cat-' . $cat->slug . '.php'))
return SINGLE_PATH . '/single-cat-' . $cat->slug . '.php';

elseif(file_exists(SINGLE_PATH . '/single-cat-' . $cat->term_id . '.php'))
return SINGLE_PATH . '/single-cat-' . $cat->term_id . '.php';

endforeach;
}
This code first checks to see if WordPress is requesting a single post. If it is, then it tells WordPress to look for the template in the /single/ folder of your WordPress theme.
Now you need to add template files defined by this code.
Connect to your WordPress hosting using an FTP client or File Manager in cPanel and go to /wp-content/themes/your-theme-folder/.
Inside your current theme folder, you need to create a new folder called ‘single’. Next, you need to open this folder and create a new file inside it. Go ahead and name this file single-cat-{category-slug}. Replace {category-slug} with your actual category slug.
For example, if you have a category called ‘News’, then you will create single-cat-news.php file. If you have a category called ‘Travel Tips’, then create a template single-cat-travel-tips.php, and so on.
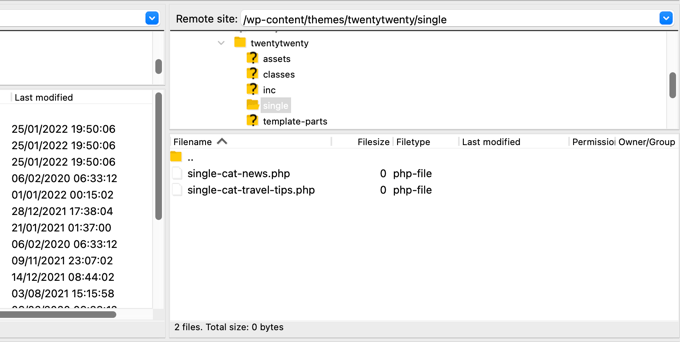
Now, these template files will be totally empty. As a starting point, you can copy the contents of your single.php file from your theme folder and paste them inside each of these templates. After that, you’ll need to edit these templates to make your desired changes.
Once you’re done, you can go to your website and view a post. It will use the template that you have created for the category where this post is filed.
Now let’s suppose you have a post filed in two categories News and Travel Tips. WordPress will automatically show the template for ‘News’ because it appears first in alphabetical order.
On the other hand, if you filed a post in a category and didn’t create a template for that category, then WordPress will fall back to the default single.php template of your theme.
Creating Custom Single Post Templates for Specific Authors
Let’s suppose you want posts written by a specific author to look different on your website. You can do that using code by following the same technique we showed for categories.
First, you need to add this code to your theme’s functions.php file or a code snippets plugin.
/**
* Define a constant path to our single template folder
*/
define(SINGLE_PATH, TEMPLATEPATH . '/single');

/**
* Filter the single_template with our custom function
*/
add_filter('single_template', 'my_single_author_template');

/**
* Single template function which will choose our template
*/
function my_single_author_template($single) {
global $wp_query, $post;

/**
* Checks for single template by author
* Check by user nicename and ID
*/
$curauth = get_userdata($wp_query->post->post_author);

if(file_exists(SINGLE_PATH . '/single-author-' . $curauth->user_nicename . '.php'))
return SINGLE_PATH . '/single-author-' . $curauth->user_nicename . '.php';

elseif(file_exists(SINGLE_PATH . '/single-author-' . $curauth->ID . '.php'))
return SINGLE_PATH . '/single-author-' . $curauth->ID . '.php';

}
Next, you should connect to your website using FTP or cPanel file manager in cPanel and then go to /wp-content/themes/your-theme-folder/. If you haven’t already created a folder called /single/ inside it, then go ahead and create it now.
Inside this folder, you need to create a template using the author’s username in the template name. For example, single-author-johnsmith.php.
This template will be empty, so you can copy and paste the contents of your theme’s single.php template and use it as a starting point.
You can now visit your website to view a post created by a specific author. It will use the template you created.
We hope this article helped you learn how to create custom single post templates in WordPress. You may also want to learn how to track website visitors to your WordPress site, or see our list of must have WordPress plugins to grow your site.
If you liked this article, then please subscribe to our YouTube Channel for WordPress video tutorials. You can also find us on Twitter and Facebook.
The post How to Create Custom Single Post Templates in WordPress first appeared on WPBeginner.
