Want to just get started? Click here to sign up for DreamHost and start encrypting your email today.
As a small business, keeping your data secure is an ongoing battle, especially when you must send sensitive information via email.
When you want to make certain that an unintended person does not intercept this information, you can encrypt your email messages.
Use the following steps to encrypt your email, whether you are using an email hosting provider or you are sending messages from your hosting domain’s email address through Gmail.
The Top Email Hosting Providers to Encrypt Email
For small businesses and entrepreneurs, using an email hosting provider is a great way to create an email address with your own domain name in it. You may be able to encrypt the messages through your email host, or you can link your Gmail address to your email host and encrypt the messages through Gmail (if you are using Google Workspace).
- DreamHost — Best All-Around Email Hosting Provider
- Hostinger — Best Budget-Friendly Provider
- Scala Hosting — Best for Significant Storage
- Google Workspace — Best for Google-Centric Users
- Microsoft 365 Business Standard — Best for Microsoft-Centric Users
- Intermedia — Best for Email Security
- Amazon WorkMail — Best for AWS-Centric Users
You can read our full reviews of each email hosting provider here.
3 Steps to Encrypt Email
Even when using an email hosting provider, you can send messages through your Gmail account using your business domain’s email address by linking them together. We will focus on discussing how to encrypt email through Gmail for this reason, rather than explaining the encryption steps required for each individual email hosting provider.
- Step 1: Set Up Your DreamHost Email Address
- Step 2: Add Your Domain Email Address to Gmail
- Step 3: Protect Your Messages in Gmail
- Bonus Step: Adding Let’s Encrypt to DreamHost
The Easy Parts of Encrypting Email
We would not call the process of encrypting email particularly easy, as it requires multiple steps to make the process work. But it does offer quite a few benefits.
Assured protection: When you can send important information via an encrypted email, you can be certain that the information will not fall into the wrong hands. Once you work through the process of encrypting your email messages, having sensitive information fully protected through email encryption can give your organization significant peace of mind.
No tampering: With an encrypted email, you can be confident that no hacker intercepted the message en route to you or to your recipient and changed the information in the message.
Repeated success: Once you are able to send an encrypted email to a particular recipient successfully, you can continue to have success with that recipient. You do not have to change multiple settings each time you send a message using encryption to the same recipient.
Verified senders: When you are receiving an encrypted email message, you can be confident that the person or organization sending the message is who they claim to be.
Compliance with regulations: If your organization works in an industry where you must follow certain regulations, such as privacy through HIPAA, you will need to use encrypted email messages any time you are sending potentially sensitive data. Failing to encrypt these messages could leave your organization in violation of the regulation or standards.
The Difficult Parts of Encrypting Email
Although the process of encrypting email messages has quite a few benefits, it can be such a time-consuming hassle that some people simply choose not to use it.
Extensive setup: You can’t just click a button and magically have encrypted emails. You need to perform multiple steps on your end to enable the encryption method that your email hosting provider supports. You also need the recipient to be able to accept the encrypted email. This can be a significant challenge.
Incompatibilities: Some email clients’ encryption methods are not compatible with each other. For example, Gmail’s use of S/MIME for encryption may cause error messages in other email clients. If you are using Gmail’s S/MIME encryption method, and the recipient is not, you may need to deploy time-consuming troubleshooting work.
Lost data potential: If the recipient loses the key to unlock the encrypted data or never receives the key as intended, the information in the email is not available to them. When sending time-sensitive data that needs an immediate reply, this can be disastrous.
Step 1: Set Up Your DreamHost Email Address
To be able to use Gmail to encrypt the emails you are sending through your email hosting provider, you first must create an email address that uses your business domain name with your provider. We will use DreamHost as the email hosting provider for this example.
Create an Email Address in DreamHost
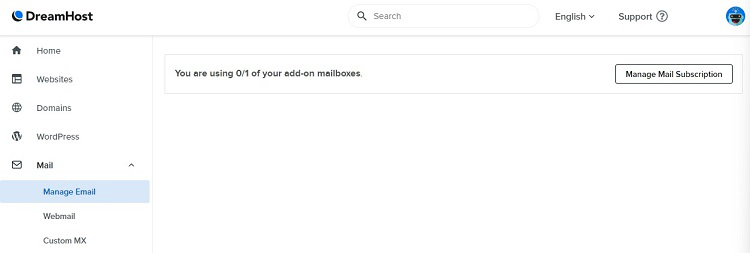
As a DreamHost subscriber, you can create an email address that matches your domain. (You first will have to add a domain that you own to DreamHost.)
Using a domain name in your email address provides a more professional look for your business or organization versus using a generic Gmail address. Rather than sending emails from AllStarPlumbing76543@gmail.com, you can send emails from JoeSmith@AllStarPlumbing.com.
After adding your domain to DreamHost, click Mail along the left side of the DreamHost screen. In the expanded menu, click Manage Email to begin setting up your email address. Then click the Create New Mail Address button.
Select Your Email Settings
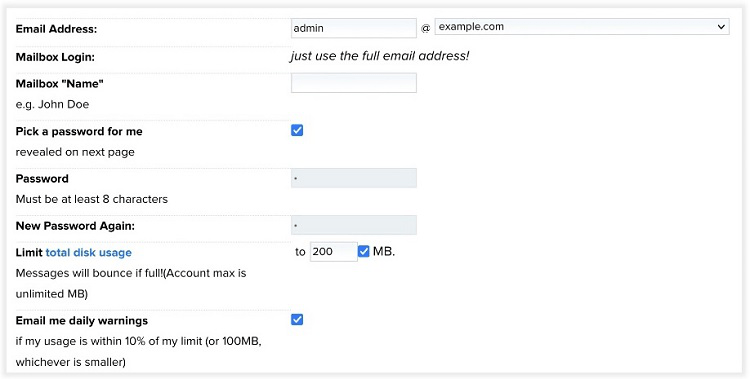
In the next DreamHost window, add the information for your email address, including the alias name you want to use, along with your domain name. You also can decide the maximum number of messages to save in your Inbox, how frequently to remove old messages, and other items.
After entering all the information, click the Create Address button. If you entered everything correctly, DreamHost should give you a message that shows you were successful. However, you may need to wait a few hours to begin sending and receiving messages. (Understand that it can take up to six hours for the new mail address to be ready to use, especially if this is the first email address alias you created under that domain name.)
Step 2: Add Your Domain Email Address to Gmail
When you create an email address for your domain at DreamHost, you have the ability to add this address to your Gmail account. You then can send messages in the Gmail client, while making use of your domain name at DreamHost as the sender, rather than using your Gmail account as the sender.
You will need to make sure your Gmail client is properly configured before you can begin sending messages with encryption. You need to change the outgoing server name in Gmail to smtp.dreamhost.com rather than setting it to your business domain name. This is a change in Gmail that occurred a couple of years ago.
Work in Gmail to Add the Email Address

Start by logging into your Gmail account through a web browser. On the Gmail screen, click the gear icon in the upper right corner of the screen. In the drop-down menu, click on the See All Settings button. Click the Accounts and Import link across the top of the page.
Scroll down the page until you reach the Send Mail As section. In this section, click on the Add Another Email Address link.
Enter the Domain Email Address Information
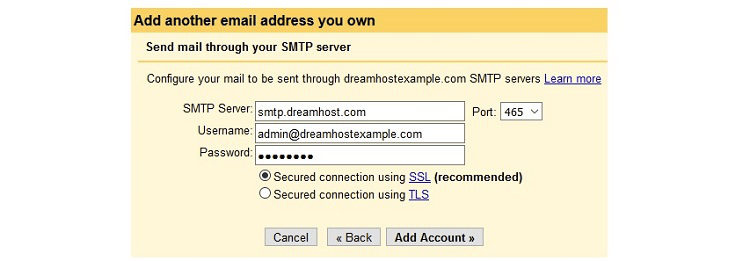
In the popup window, you can begin entering information about your domain name and email address. Some of the information you will need to enter includes:
- Your name
- Domain email address
- SMTP server (which we mentioned at the start of this step)
- Port number (usually 465)
- Your DreamHost email password
You then will need to click the button to use SSL. Finally, click the Add Account button.
Verify the Added Email Address in Gmail

Gmail will send an email message with a verification code to your domain email address. You will need to return to DreamHost to view this message and to retrieve the code. Enter the code in the text box and click the Verify button.
Then return to the Accounts and Import link in the Settings window. Scroll down to the Send Mail As section again. Now you should see your domain email address listed.
If you want to use this address as the sender address in a Gmail message, click the Compose button in Gmail. In the From area, click the down arrow. Then select the domain name email address that you want to use. Compose your message and click the Send button, and Gmail will send the message with your domain email address listed as the sender.
Step 3: Protect Your Messages in Gmail
Google makes use of two different options for protecting email messages in Gmail, depending on whether you are using the free version of Gmail or the subscription version of Google Workspace.
Encrypted Gmail With Google Workspace
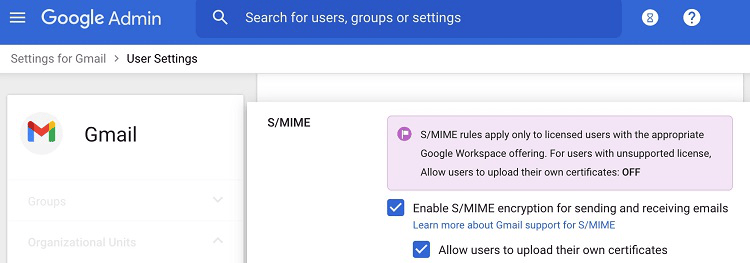
As a subscriber to Google Workspace, you can encrypt your emails sent through Gmail with S/MIME (Secure/Multipurpose Internet Mail Extensions).
To enable S/MIME within Google Workspace, open your Google Admin console. Click Apps, followed by Google Workspace. Then click Gmail, followed by User Settings.
Along the left side of the screen, click Organizations to expand this menu. Click on the organization or domain name that you want to use with S/MIME.
On the right side of the screen, scroll down to the S/MIME section. Click the pencil icon on the right side of the S/MIME section to open the edit window for S/MIME.
Add a checkmark in the Enable S/MIME Encryption for Sending and Receiving Email checkbox. To allow non-Google Workspace users to receive encrypted emails, you will need to add a checkmark in the Allow Users to Upload Their Own Certificates checkbox. Click Save at the bottom of the window.
You then need to return to the Settings window in Gmail by clicking the gear icon. Click Accounts along the top of the window. In the Send Mail As section of the window, click edit info. You then will need to add your S/MIME certificates.
Once you finish adding these certificates, you should be able to begin sending and receiving encrypted messages through Gmail, using your DreamHost domain name email address.
Gmail Confidential Mode
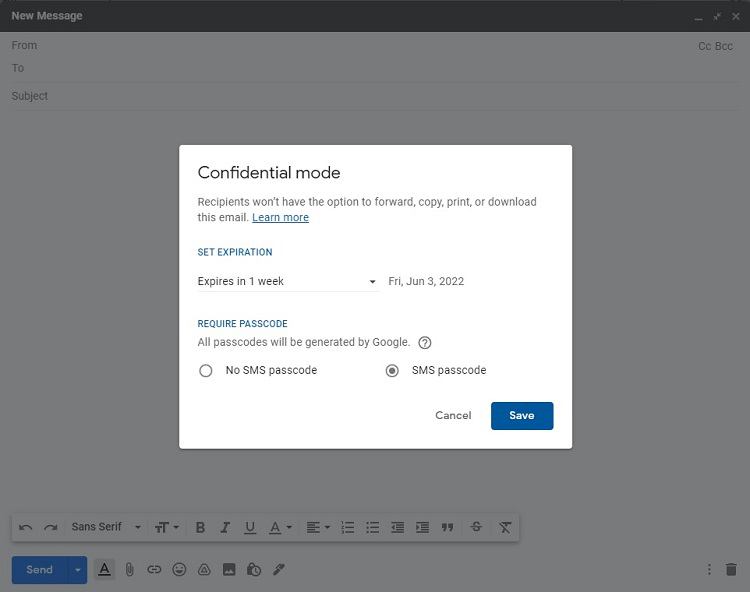
In the free version of Gmail, you will use Confidential mode to protect your email messages. This is not quite the same as sending an encrypted email, but it does protect the contents of the message so that only the recipient can see the message.
Confidential mode places the email message on a Google server. The recipient will receive a link to the message, along with a passcode. By clicking the link, the recipient can view the message on the Google server. The recipient cannot forward or download the message. As the sender, you also have the ability to revoke the recipient’s access to the message after a certain amount of time.
Start by clicking the Compose button to create a message in Gmail. Be sure to select your domain name email address as the sender in the From area.
At the bottom of the New Message window, you will see a series of icons. Select the second icon from the right, marked with a clock and a lock. In the Confidential Mode window, you can select an expiration date for your message.
In the Passcode area, you can click SMS Passcode to have the passcode sent via text message to the recipient. (You will need to enter the recipient’s phone number for the text message.)
Click No SMS Passcode to avoid sending a code via text message. Under No SMS Passcode, recipients using Gmail will not need to enter a passcode to view the message. Non-Gmail users will receive a passcode via email.
Bonus Step: Adding Let’s Encrypt to DreamHost
If you would prefer to send encrypted emails directly through your email hosting provider, you will need to follow the specific steps for that provider.
With DreamHost, for example, you will need to make use of a free open certificate authority (CA) called Let’s Encrypt. When you add a domain name to DreamHost, which you will need to do before you can create a domain email address name in DreamHost, you can use Let’s Encrypt for free.
Understand that Let’s Encrypt doesn’t fully encrypt a message until it reaches the intended recipient. Instead, Let’s Encrypt will encrypt the data as it travels from your device to the Let’s Encrypt server. The connection contains encryption, rather than the message itself.
Primarily, Let’s Encrypt focuses on securing your domain through SSL (Secure Sockets Layer) and TLS (Transport Layer Security). These are high-level security standards that allow websites to make use of HTTPS (Hypertext Transfer Protocol Secure). In other words, when you are using Let’s Encrypt with your website in DreamHost, you can use HTTPS with your website.
When you add a Let’s Encrypt certificate to DreamHost, it will secure your domain’s website and it will secure the connection for your emails. Each domain you are using in DreamHost must have a different Let’s Encrypt certificate.
Setting Up Let’s Encrypt
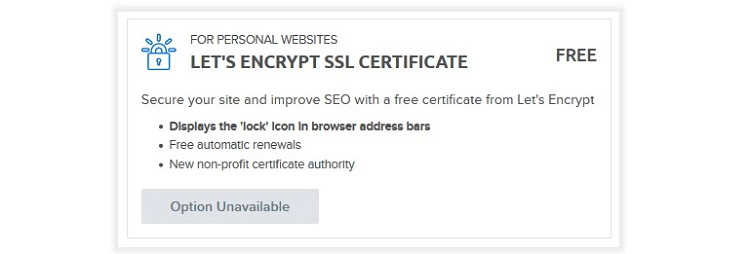
You need to have the DNS of your domain entered in DreamHost before you can use Let’s Encrypt. The authentication of the Let’s Encrypt certificate requires allowing Let’s Encrypt to create a folder at your site.
If Let’s Encrypt cannot create the folder for the certificate, you will see the error message pictured above.
Add the Secure Certificate

To select your Let’s Encrypt certificate, click Websites along the left side of the DreamHost screen. After expanding the menu, click Secure Certificates.
You then should see a list of your domain names available in DreamHost. Find the domain name from which you want to send emails through Let’s Encrypt (and the domain with which you want to use HTTPS). Click the Add button to the right of the domain name listed.
You’ll then see a list of certificates from which you can choose. The Let’s Encrypt certificate is free to use, so you can click on its Select This Certificate button to make use of Let’s Encrypt.
You should see a message that verifies that you now have the certificate. This means that Let’s Encrypt will encrypt the connection across which the email message travels.
