Are you looking for a way to fix ‘Error 521’ with WordPress and Cloudflare?
If you’re seeing this error message, then so is everyone who tries to visit your website. This is bad news for the visitor experience and your conversion rates. It may even cost you your search engine rankings.
In this article, we will show you how to fix the 521 error with WordPress and Cloudflare.
What Causes Error 521 with WordPress and Cloudflare?
If you see a 521 error when trying to visit your WordPress website, this means your browser is connecting to Cloudflare successfully, but Cloudflare isn’t connecting to the server that hosts your website.
Often this is because your server is offline.
There’s also a chance your WordPress hosting server may be online, but it’s blocking Cloudflare. Typically this WordPress error happens when a server mistakes Cloudflare for a security threat. This is usually due to a problem with how your server or Cloudflare is set up.
But don’t worry, we have five troubleshooting steps that you can follow to fix this error quickly.
If you’re unsure what’s causing your 521 error, then we recommend starting with step 1 and working your way through the each step. If you prefer to jump straight to a particular step, then you can use the links below.
- Contact Your Hosting Provider
- Check Whether Your Server Is Offline
- Whitelist All of Cloudflare’s IP Addresses
- Ask Your Hosting Provider to Enable Port 443
- Create and Upload a Cloudflare Origin Certificate
1. Contact Your Hosting Provider
When you get a 521 error, there are steps you can take to fix the problem yourself. However some of them can be time-consuming and technical.
With that in mind, the easiest way to fix a 521 error is by contacting your WordPress hosting provider. A good web host should be able to tell you why you’re getting this error. They may even be able to fix the problem for you.
If you’re unsure how to contact support, then head over to your hosting provider’s website. You can then look for any Contact Us or Support pages.
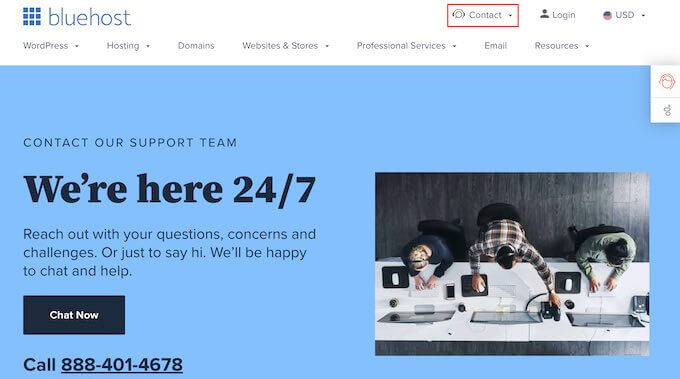
To help you fix this problem as quickly as possible, we recommend choosing live support options where available. For example, live chat or business phone support is almost always faster than ticketing portals or email.
If you’re unable to get support from your hosting provider right away, then you can try the following steps.
2. Check Whether Your Server Is Offline
When you get a 521 error, it’s always worth checking whether your server is online.
If it’s still online, then you can try other troubleshooting steps.
To do this, you’ll need to know your server’s IP address. This is a string of numbers that identifies a piece of hardware on a network.
You can use this IP address to ‘ping’ the physical server that hosts your WordPress website. If the server responds, you’ll know that it’s online.
If it doesn’t respond, then your server is offline and this is what’s causing your 521 error.
To get your IP address, you’ll need to log into your website’s control panel. This is usually supplied by your hosting provider, and is typically either cPanel or a custom panel.
Once you’re logged in you can look for any settings labeled ‘IP address.’
If you’re a Bluehost customer, then you just need to log into your cPanel dashboard. You can then click on Advanced in the left sidebar.
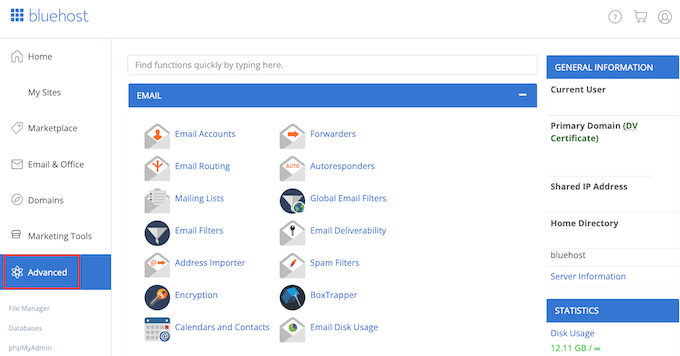
On this screen, find the General Information section.
Bluehost will show your server’s IP address under ‘Shared IP address.’
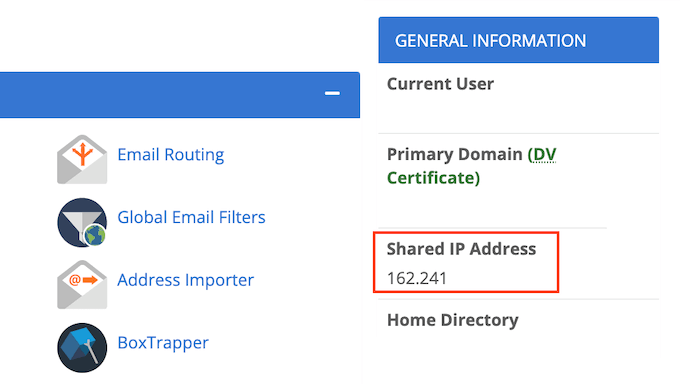
If you’re struggling to find this IP address, it’s always worth checking your hosting provider’s website or online documentation. Many web hosts have detailed tutorials showing you how to find your IP address.
Once you have this information, head over to the HTTP Header Checker tool. You can use this tool to ‘ping’ your website’s server and see whether it responds.
To do this test, simply paste your IP address into the ‘URL’ field.
Then add ‘http://’ in front of your IP address. This turns this string of numbers into a web address. For example:
56.18.270.000
Becomes:
http://56.18.270.000
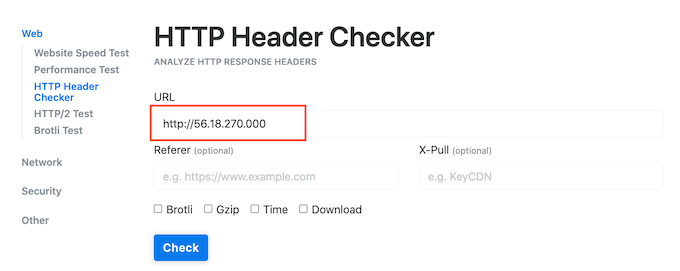
Next, click on the Check button. HTTP Header Checker will now try to talk to your server.
If your server is offline, then you’ll see a message such as ‘Failed to connect’ or ‘Host Not Found.’
This explains why you’re getting the 521 error. In this case, you’d need to contact your hosting provider to fix it.
If your server is online, HTTP Header Checker will show a ‘2XX’ status code. You may also see a ‘3XX’ status code if your server is online but is temporarily redirecting to a new location.
If your server is online, then an outage or server downtime isn’t causing your 521 error. In that case, you can continue following this guide to fix the error.
3. Whitelist All of Cloudflare’s IP Addresses
Your server may be online, but blocking Cloudflare’s IP addresses. This can cause the 521 error when you try to visit your WordPress website.
The solution is to whitelist all the IP addresses that Cloudflare uses. By whitelisting an IP address, you’re telling your server to allow all requests coming from that address.
You can add whitelisted IPs to your website’s .htaccess file. This is an important configuration file that tells the server how it should act.
To edit your .htaccess file, you’ll need an FTP client such as FileZilla.
If you haven’t used an FTP client before, you may want to see our guide on how to use FTP. This post shows you how to connect to your server using an FTP client.
Once you’re connected to your server, you’ll need to open your website’s root folder. To reach it, simply open the folder that shows your website’s address.
Next, open the ‘public_html’ folder.
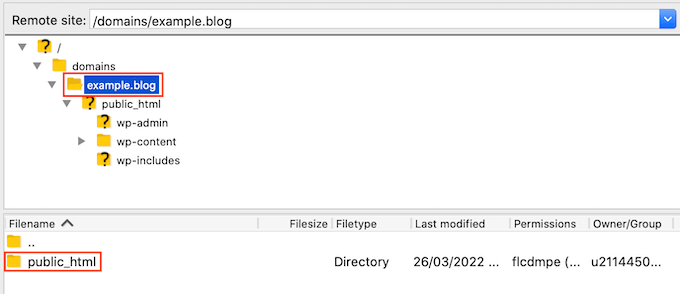
You should now see your website’s .htaccess file.
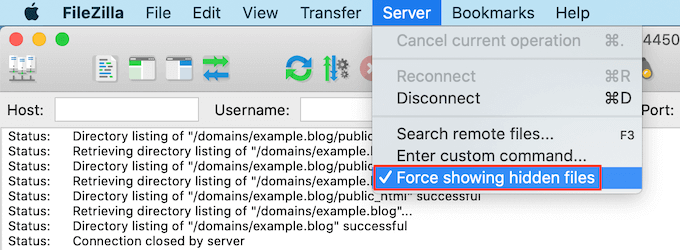
Some FTP clients hide sensitive files by default. If you don’t see an .htaccess file, then you’ll need to enable the ‘show hidden files’ option in your FTP client.
If you’re using FileZilla, just select Server from the toolbar. Then click on ‘Force showing hidden files.’
If you’re still struggling to find .htaccess, then please see our guide on how to find the .htaccess file in WordPress.
When you’re ready to edit this file, simply Control-click on the .htaccess file.
Then, select View/Edit.
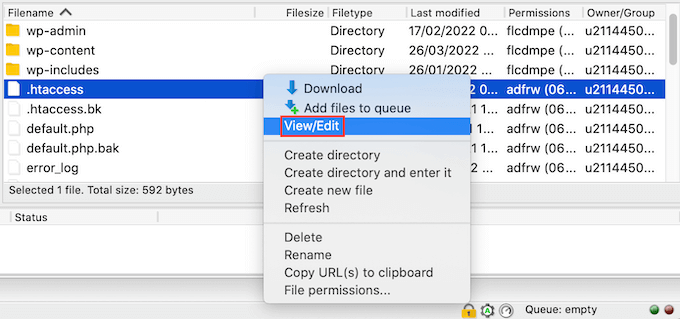
This will open .htaccess in your computer’s default text editing program.
Inside this file, find the ‘# BEGIN’ line. You’ll need to add all the Cloudflare IP addresses above this line.
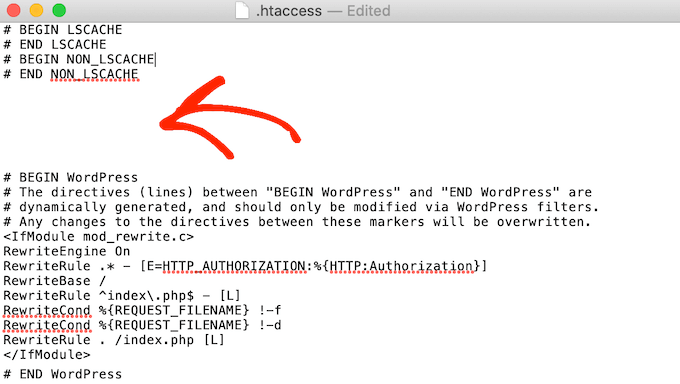
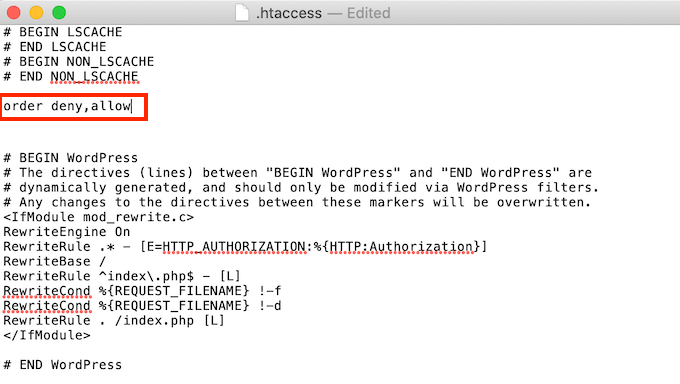
To start, type the following on a new line:
order deny,allow
In a new tab, open the list of Cloudflare IP ranges.
To whitelist an IP address, you’ll need to type ‘allow from’ and then either copy/paste or type the IP address. This means that:
103.21.244.0/22
Becomes:
allow from 103.21.244.0/22
You’ll also need to add each IP address on a new line.
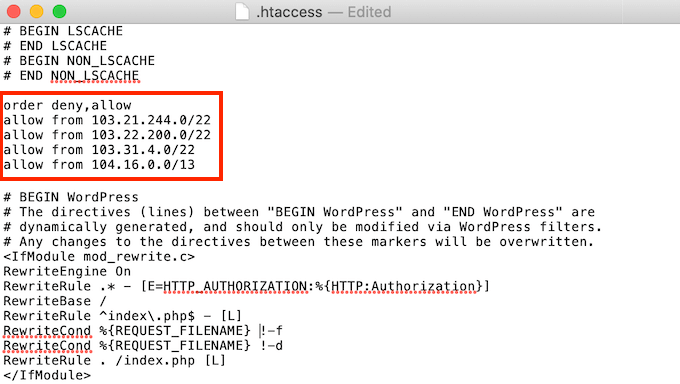
After adding all the Cloudflare IP addresses, save your changes. You can now close the .htaccess file.
Now you can go ahead and visit your site, to see whether this has fixed ‘Error 521.’
4. Ask Your Hosting Provider to Enable Port 443
Cloudflare has a few different encryption modes.
Did you switch to Full or Full (Strict) mode, right before getting the 521 error? This may have caused the problem.
When Cloudflare is in Full or Full (Strict) mode, it needs access to port 443. However, some servers prevent Cloudflare from accessing this port, which will trigger the ‘Error 521′ error.
The solution is to enable port 443 on your server.
This process will vary depending on your hosting provider and your server’s settings. With that in mind, we recommend contacting your hosting provider and asking them to enable port 443 for you.
5. Create and Upload a Cloudflare Origin Certificate
Even with port 443 enabled, you may still get the 521 error when using Cloudflare’s Full or Full (Strict) mode.
This is because some servers only allow connections on port 443 if you have a valid Cloudflare Origin Certificate. This certificate encrypts the traffic between Cloudflare and your web server.
If you don’t provide an Origin Certificate, you may get an ‘Error 521.’
The good news is that Cloudflare can walk you through the process of creating this certificate, step by step.
To get started, log into your Cloudflare account. Then go to SSL/TLS » Origin Server.
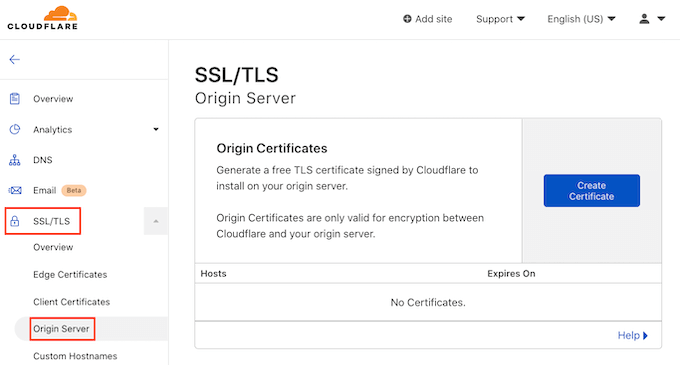
Next click on the Create Certificate button.
Cloudflare will now ask for a private key and a Certificate Signing Request (CSR).
Do you already have a private key and CSR? Then simply select the ‘Use my private key and CSR’ checkbox.
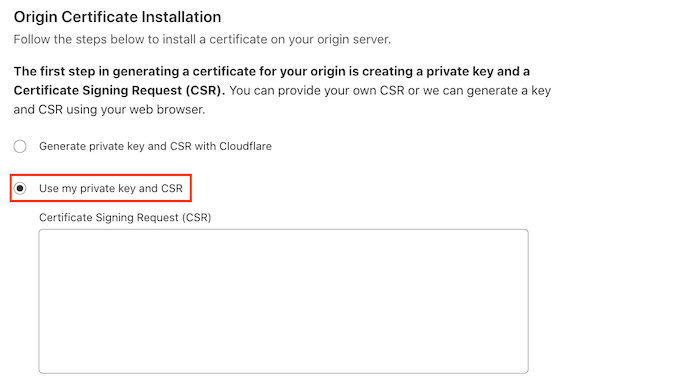
You can now type your CSR into the ‘Certificate Signing Request (CSR)’ box.
If you don’t have a CSR and key, don’t panic! Cloudflare can create these two things for you.
To get started, select ‘Generate private key and CSR with Cloudflare.’
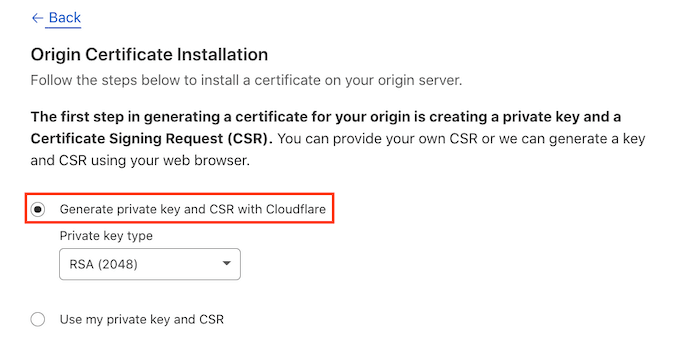
You can now choose whether to create an RSA key or an ECC key.
Most security experts agree that ECC and RSA are equally secure. However, ECC has a shorter key length. This means that ECC keys are faster.
For this reason, we recommend you create an ECC key.
Once you’ve made your decision, open the ‘Private key type’ dropdown. You can then select either RSA or ECC.
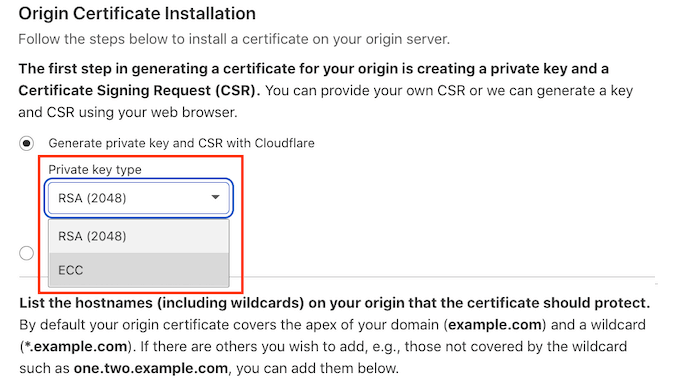
Next, scroll to the Hostnames field. Here you can add all the hostnames that you want to protect. This may sound complicated, but Cloudflare does a lot of the work for you.
You’ll see that Cloudflare has already added your root domain name.
Cloudflare also automatically adds a wildcard, which is your website’s domain plus a * symbol. This is a ‘catch-all’ that makes sure your subdomains are properly protected. For example, if your root domain is ‘www.example.com’ then this wildcard will ensure your ‘store.youurwebsite.com’ subdomain is also protected. For more details, see our complete guide to subdomains.
These default values should be enough to protect most websites. However, if you need to add more hostnames then you can just type them into the ‘Hostnames’ field.

Next scroll to the ‘Certificate validity’ section.
Your certificate will be valid for 15 years by default.
Need more time? Then just open the ‘Certificate validity’ dropdown and choose a new value.
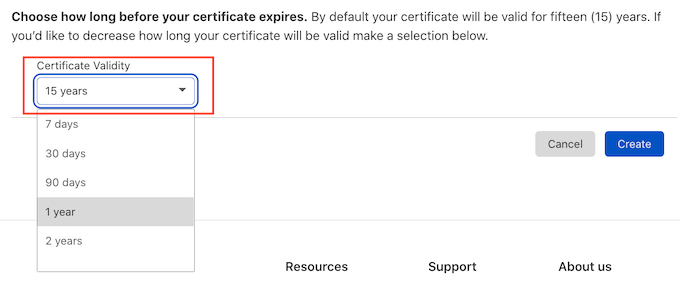
When you’re happy with all the information you’ve entered, click on the Create button.
Cloudflare will now create your certificate.

Cloudflare will then show an Origin Certificate and Private Key. You’ll need to copy this information into separate files.
NOTE: You won’t be able to see the Private Key again after leaving this screen. With that in mind, make sure you store this key somewhere safe.
You can now upload your Origin Certificate to your web server. The steps may vary depending on your hosting provider and server.
To help you out, Cloudflare has published instructions for the different types of web servers.
Once you’ve installed the Origin Certificate on your server, the final step is updating your SSL/TLS encryption mode.
In your Cloudflare dashboard, go to SSL/TLS.
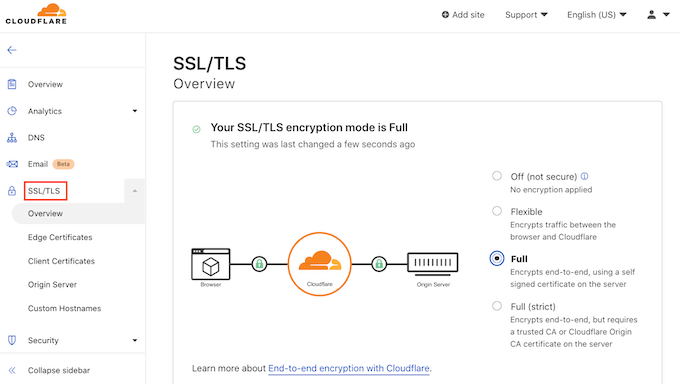
Now find the ‘SSL/TLS encryption mode’ section.
In this section select ‘Full (strict).’
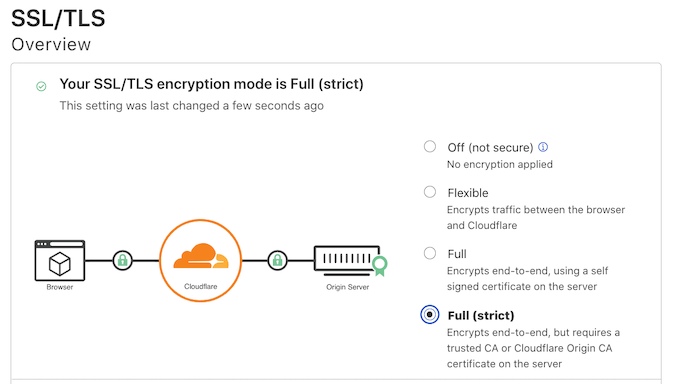
Cloudflare is now using your Origin Certificate. You can now check your site to see whether this has fixed the ‘Error 521’
We hope this article helped you learn how to fix ‘Error 521’ with WordPress and Cloudflare. You may also want to see our guide on best managed WordPress hosting if you’d like your hosting company to deal with the technical details, or see our roundup of the best business VoIP providers for small businesses.
If you liked this article, then please subscribe to our YouTube Channel for WordPress video tutorials. You can also find us on Twitter and Facebook.
The post How to Fix Error 521 with WordPress and Cloudflare first appeared on WPBeginner.
