Do you want to use the More block on your WordPress website?
WordPress gives you several different ways to show a preview of your posts on the archive and homepage. This can help catch the visitor’s attention and get them to read the full post.
In this article, we will show you how you can properly use the More block in WordPress. We’ll also show you how to create an excerpt, just in case you’re using a theme that ignores the More block.
When to Use the More Block in WordPress
Many websites use post previews to encourage visitors to check out the full version.
As a WordPress user, you can create post previews in a few different ways. For example, you might use a WordPress accordion plugin or show and hide content using the toggle effect.
By default, most modern WordPress themes automatically show a preview of your posts on the homepage and blog archives instead of the full post. For example, on our blog page we show a few words and then a ‘Read More’ link to see the full blog post.
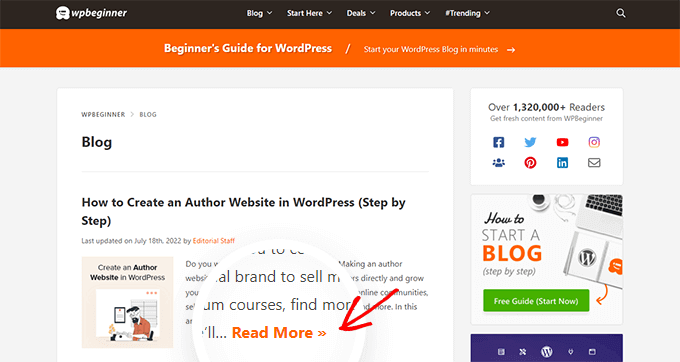
This preview text helps visitors to see more of what topics are available on your blog without having to scroll through every post. It also helps to increase pageviews since your visitors will have to click through to finish reading a post.
You can control exactly what WordPress shows in these previews by using either the More block or an excerpt.
The best choice for your site will vary depending on your WordPress theme. Some themes will ignore any More blocks you create, so you’ll need to use an excerpt instead.
To help you show an engaging preview no matter what theme you’re using, we’ll be covering both More blocks and excerpts.
If you prefer to jump straight to a particular method then you can use the links below.
How to Properly Use the More Block in WordPress
The WordPress block editor has a built-in More block that allows you to specify the exact cut off point for the preview text of any WordPress post. In the classic editor, it was previously known as the More tag.
You can add the More block anywhere in the post, including mid sentence or in the middle of a paragraph.
All of the content above the More block will appear on your blog archive pages and wherever else your posts are listed on your WordPress site. WordPress will also add a ‘Read More’ link to the preview, so visitors can click to read the full version of the post.
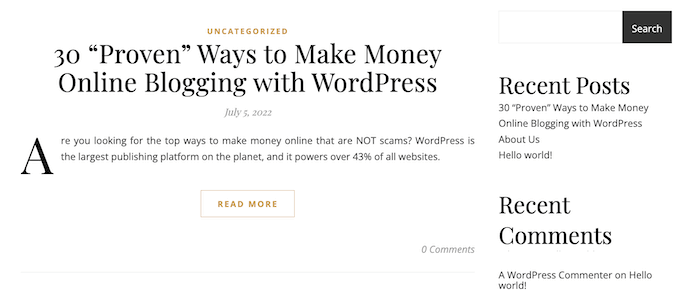
Note: Every WordPress theme is different and some may override the default ‘Read More’ label. With that in mind, you may see different text on your ‘Read More’ button.
Before you add a More block to your post, it’s important to check that your site is set up to show the latest posts on the homepage. If you are using a static page as your custom homepage, then your theme may ignore the More blocks and use its own settings instead.
Not sure if you’re using a static front page as your homepage? To check, simply go to Settings » Reading in the WordPress dashboard.
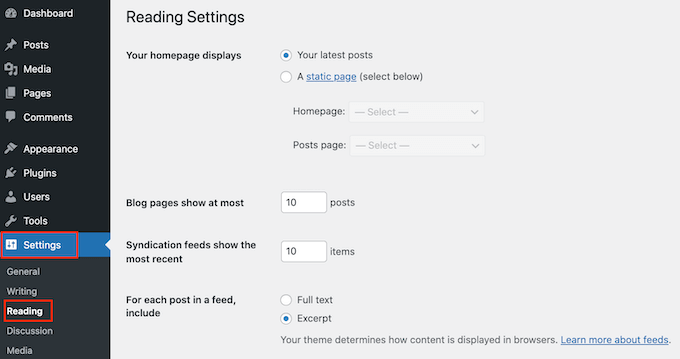
At the top of this screen, you’ll see a ‘Your homepage displays’ section. If ‘Your latest posts’ is selected, then you should have no problems using the More block.
To get started, simply open the post where you want to add a More block. Then, find the spot where you want to create the cut off point for your preview, and click on the + icon to add a new block.
You can then type in ‘More’ and select the right block to add it to your page.
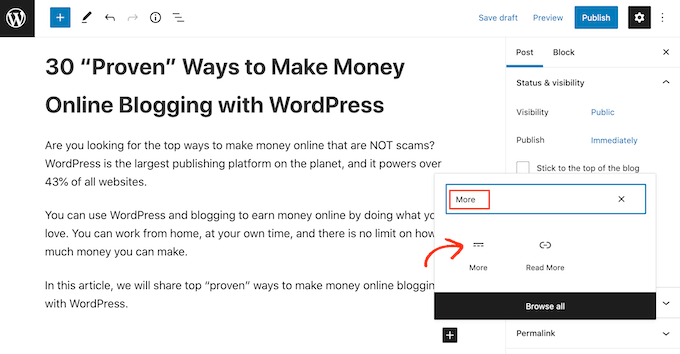
Some themes have a limit on how many words they will show on their homepage and archive pages. There’s a chance your theme may override the More block if you try to include a very large number of words in your preview. With that in mind, it’s a good idea to create the cut off point early in the post.
You can now carry on writing the rest of your post as normal.
You’ll be able to see the More block when editing your post in the block editor, but your visitors won’t see it when they’re reading the post on your WordPress blog.
Just like any other block, WordPress has some settings that you can use to configure the More block. To see these settings, simply click to select your More block.
In the right-hand menu, you can now choose whether to hide or show the excerpt on the full content page, which is the page you’re currently looking at.
By default, all of the content above the More block will appear on the full content page, as you can see in the following image.
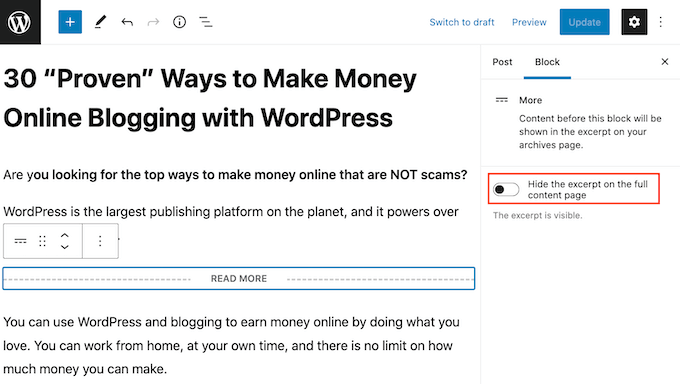
However, you may want to write a custom excerpt that will only appear on your homepage and archive page, and not in the full post itself.
To do this, simply click the ‘Hide the excerpt….’ slider to turn it from white to blue.
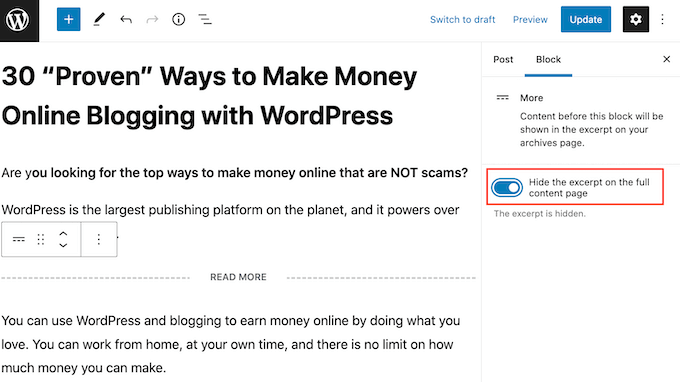
Now, everything above the More block will appear on the archive page and homepage only.
Once you’re finished, you can go ahead and save your changes by clicking on the Update or Publish button.
Now if you visit your homepage or blog archive page, you’ll see the preview you just created for this post.
Are you seeing something different?
Then your WordPress theme may be ignoring your More blocks.
Some themes are designed to show excerpts and will override all of your More blocks. If your homepage and blog archives aren’t showing the preview you created using the More block, then you may need to use excerpts instead.
How to Change the More Block’s ‘Read More’ text
By default, the More block will show a Read More link on your archive and homepage.
There are a few different ways to change this text, but you may get slightly different results depending on your WordPress theme. Some themes will override your changes with their own default settings.
To start, it’s worth checking whether you can change the Read More text using the WordPress post editor.
To do this, simply open any post that has a More block. You can then click on the default ‘READ MORE’ text and type in the text that you want to use instead.
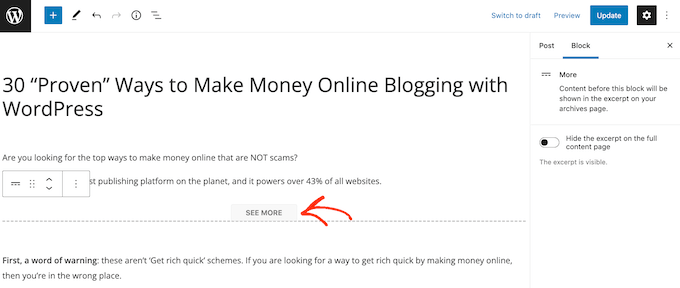
After that, either update or publish the page as normal. You can then visit your homepage or blog archive to see whether the Read More text has changed.
If you’re still seeing the original Read More link, then you may need to override your theme’s settings using code.
You can either create a site-specific plugin or use a code snippets plugin like WPCode, and then add the following code to your site:
function modify_read_more_link() {
    return '<a class="more-link" href="' . get_permalink() . '">Check out the full post</a>';
}
add_filter( 'the_content_more_link', 'modify_read_more_link', 999 );
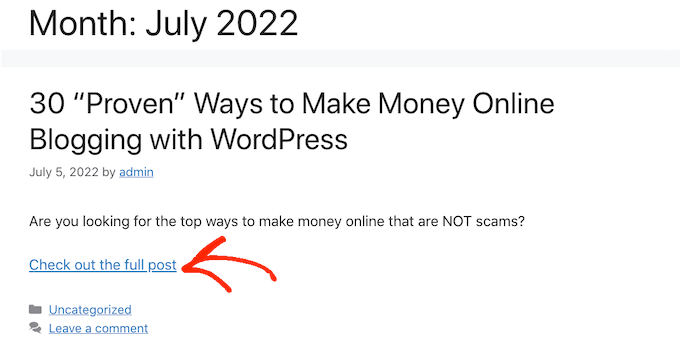
This replaces the default ‘Read More’ text with ‘Check out the full post,’ as you can see in the following image.
You can use any text you want by replacing ‘Check out the full post’ in the code snippet.
How to Properly Use Excerpts in WordPress
WordPress has two different ways to show a post preview. We’ve already covered the More block, but you can also create a preview using excerpts.
For the people who visit your WordPress blog or website, previews created using excerpts and the More block look exactly the same. However, some themes are coded to use excerpts, which means they will ignore your More blocks and show an excerpt instead.
If you don’t add an excerpt to a post manually, then WordPress will create one automatically based on the excerpt length defined by your theme. This can lead to previews that cut off mid sentence.
With that in mind, you can choose to create an excerpt manually instead. To do this, simply open a post and then click to expand the ‘Excerpt’ section in the right-hand menu.
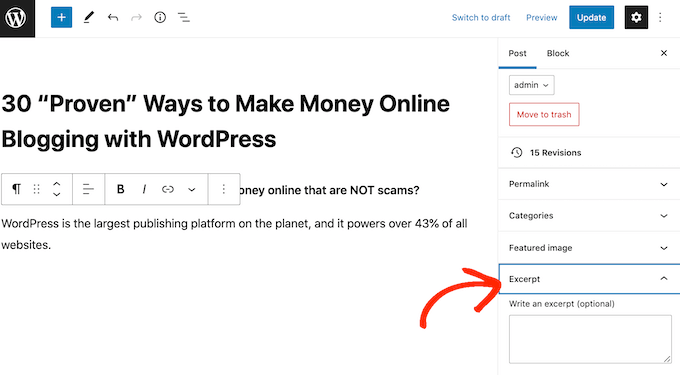
In the ‘Write an excerpt box’ you can then either type in or paste the excerpt that you want to use for the post.
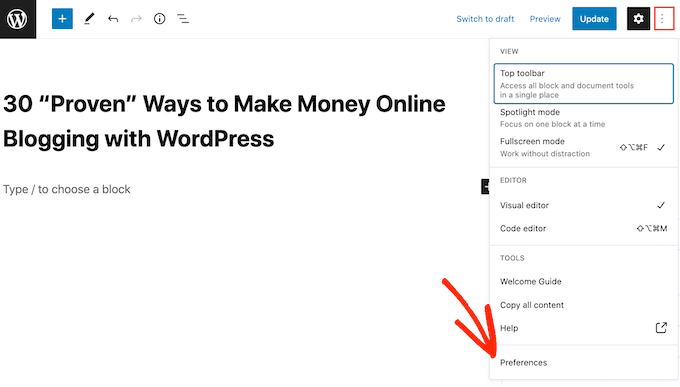
Don’t see an ‘Excerpt’ box in the right-hand menu? Then you can enable this setting by clicking on the three-dotted icon in the upper-right corner.
Once you’ve done that, click on Preferences.
In the popup that appears, simply click on ‘Panels.’
You’ll now see all the settings that you can add to the right-hand menu. Simply find ‘Excerpt’ and give it a click to turn it from white (disabled) to blue (enabled).
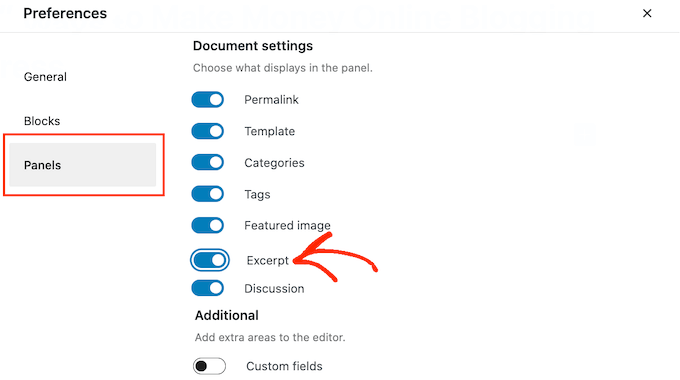
Then, simply close this popup. You should now have access to the ‘Excerpt’ settings in your right-hand menu.
Now, you can create an excerpt following the same process described above.
Once you’ve done that, simply save your changes and visit your site. You will now see your custom excerpt on the homepage and blog archive.
We hope this article helped you learn how to properly use the More tag in WordPress. You may also want to check out our ultimate SEO guide for beginners and the best WordPress landing page plugins.
If you liked this article, then please subscribe to our YouTube Channel for WordPress video tutorials. You can also find us on Twitter and Facebook.
The post How to Properly Use the More Block in WordPress first appeared on WPBeginner.
