Do you want the ability to add new profile fields when users register on your WordPress site?
Maybe you want to allow users to submit their social media profiles. Or you might want to have them submit their business phone number when registering. This can all be done by adding additional profile fields.
In this article, we will show how to add additional user profile fields in WordPress registration.

Method 1. Add Custom User Profile Fields using Advanced Custom Fields Plugin
The best way to add extra user profile fields in WordPress is to use the Advanced Custom Fields plugin.
First, you need to install and activate the Advanced Custom Fields plugin. For more details, see our step by step guide on how to install a WordPress plugin.
After you’ve installed and activated it, go to Custom Fields » Add New and give your new field a name.
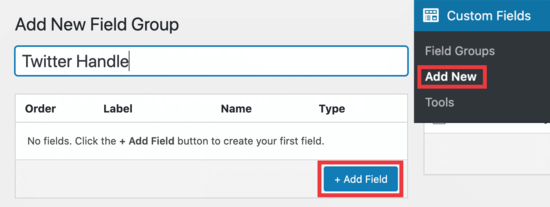
We’re calling this example ‘Twitter Handle’ since we’re setting up a custom field to add a Twitter username. However, you can name it anything you want.
Next, click the ‘Add Field’ button, and you’ll see it open up to configure your new field. Here’s our example customization.
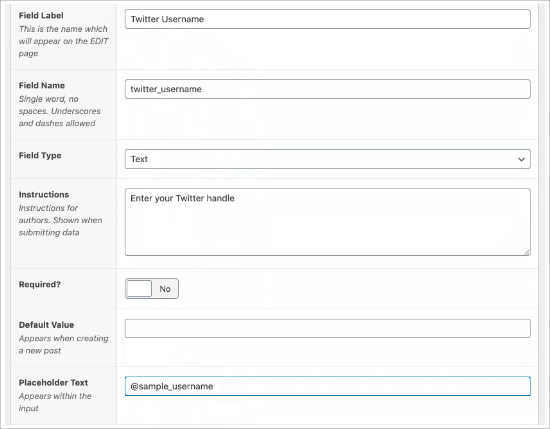
The ‘Field Label’ is the name of your field, which helps you organize your fields.
The ‘Field Name’ is auto-populated based on the name you give your field, but you can change this to be whatever you want.
The ‘Field Type’ is where you can select what type of information you want to be submitted.
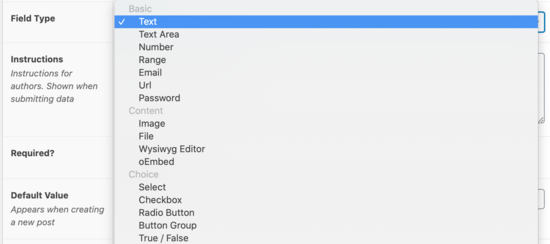
You can choose many options such as email, number, text area, url, password, and more.
The ‘Required?’ area can be turned on or off. If you want to require anyone who registers to fill out this field, then you’ll need to toggle the required button to where it says ‘Yes.’
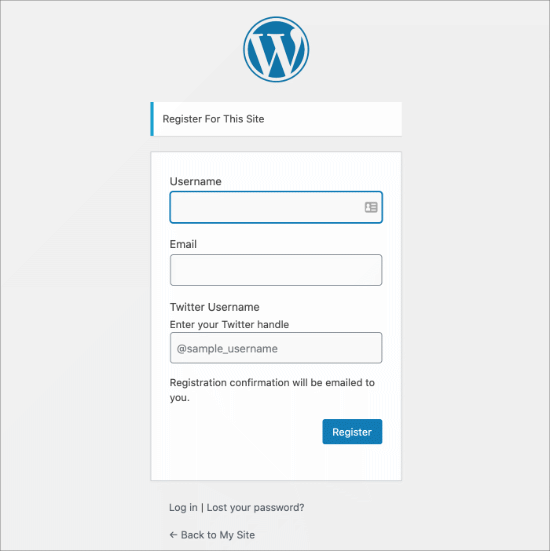
Lastly, the ‘Placeholder Text’ is what you’ll put in the field to show as an example for your users when they register. We used ‘@sample_username.’
The next step is to set the location for this profile field.
You’ll need to scroll down to the ‘Location’ area and make sure you select ‘User Role’ in the dropdown menu.

To the very right, the ‘All’ option simply means all users who register.
But if you wanted to make this rule only apply to certain user roles such as Administrator, Editor, Author, Contributor, or Subscriber, then you can make that selection there.
Next, scroll down to the settings box. Make sure the ‘Active’ field is set to ‘Yes’ and then click ‘Publish’ in the upper right corner to save this field.
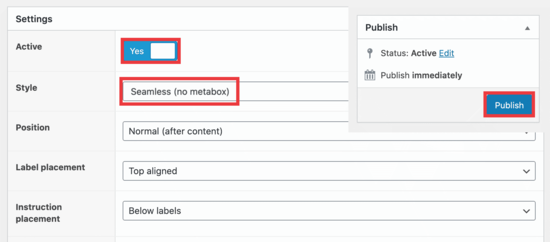
In the Style section, make sure you select ‘Seamless (no metabox)’ to prevent the name of this field appearing on your registration page.
Since we’ve already given instructions to submit the Twitter handle, you don’t want it appearing multiple times in the field as it makes it look cluttered.
Lastly, you can see all your fields by going to Custom Fields » Field Groups.

Now it’s time to check out how this is displayed on your registration page. The default url for registration is located at ‘yoursite.com/wp-login.php?action=register.’
Our example looks like this:
If you’d like to create a custom user registration form in WordPress, then you can do so by using the WPForms plugin and following our tutorial on how to create a custom user registration form in WordPress.
Method 2. Add Additional User Profile Fields with Profile Extra Fields
This method allows you to easily add extra fields to user profiles and user registration form in WordPress. It is a little less flexible, but it gets the job done.
First, you need to install and activate the Profile Extra Fields plugin. If you’re unsure of how to do this, check out our full guide on how to install a WordPress plugin.
Once the plugin is activated, it’s time to create some additional user profile fields to use on your registration forms.
We’re going to create a phone number field as an example, but you can create as many of these fields as you want.
First, go to your Profile Extra Fields » Add New page. We’re creating a field for users to submit their phone number.
You’ll see that we’ve named the field ‘Phone Number’ and selected ‘Phone number’ in the dropdown menu.
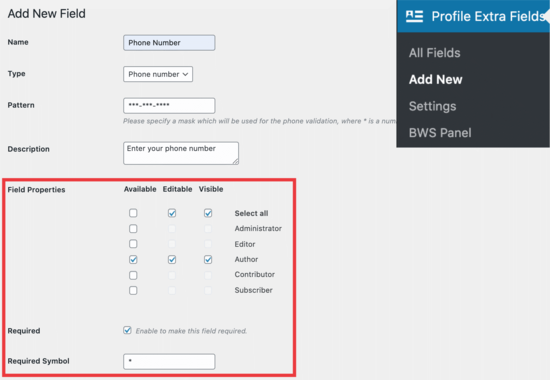
In the Field Properties, we’re checking all the boxes for the ‘Author’ user level because we want to display this field when someone registers as an Author.
Lastly, check the box to make the field required if you want them to fill out their phone number when registering.
Scroll down until you’ll this:

Make sure that box is checked so the field shows in your registration form. Don’t forget to click the ‘Save Changes’ button at the bottom before going further.
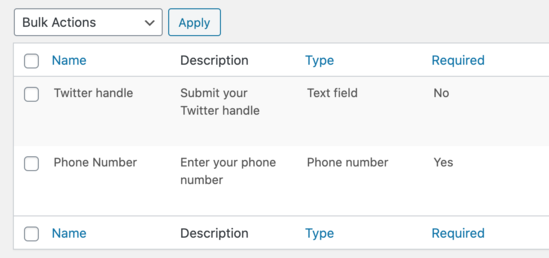
When you create these fields, you can see them when you go to your Profile Extra Fields » Add New page:
Now, you’ll want to go into your WordPress dashboard to change some settings for new registrations.
Go to Settings » General page in your WordPress admin area and then check the membership box so anyone can register.
You will need to make sure that the default role is set to the role which you have added extra fields for.

This way, you can control the level of access new users have, and this will force the registration form to show the fields you selected earlier in this tutorial.
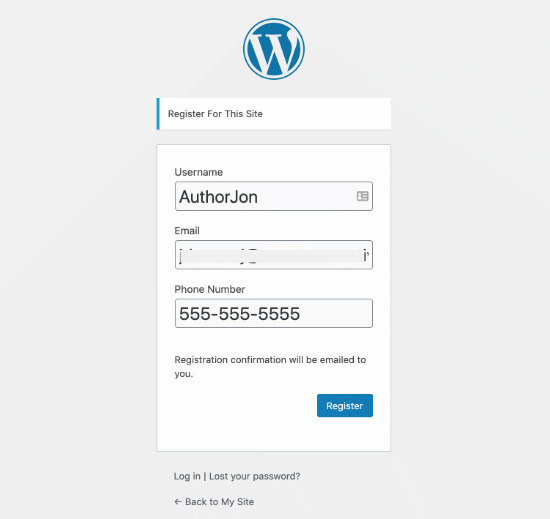
Here’s what the default registration form looks like:
Pro Tip: You can always create a custom WordPress user registration form by following our tutorial.
We’re using ‘AuthorJon’ as a test profile to show you how this new user registration will show up in the dashboard.
To see the extra fields in action, go to Users » All Users and then click on ‘edit’ for the profile you want to see.

We are looking at the user we just created, AuthorJon. When you scroll to the bottom of their profile, you’ll see the following:

As you can see, their phone number was created in their profile when they registered their account. This goes for any other field you want to use as well.
We hope this tutorial helped you learn how to add additional user profile fields in WordPress registration. You might also want to see our guide on how to create a custom WordPress login page, and our comparison of the best WordPress membership plugins to create & sell courses.
If you liked this article, then please subscribe to our YouTube Channel for WordPress video tutorials. You can also find us on Twitter and Facebook.
The post How to Add Additional User Profile Fields in WordPress Registration appeared first on WPBeginner.
Source: https://www.wpbeginner.com/feed

Want to get the best traffic software and best SEO tools on the market, that turn your advertising campaigns on auto pilot and make you passive income? Take a look on the best products available on SEO Market. CLICK HERE: https://www.k3reviews.com/
Social network traffic Facebook likes Twitter Followers Instagram Followers and much more. Our Website: https://smmsupreme.com/